Chapter 1.7: Home

Cyberpunkcity.jpg

Hito no sadame wa Kakumo hakana kimono…” came the whispered last words of my morning clocks wake up music program, before I finally managed to blindly smack my hand on the “off” button on top of it.

I usually enjoyed waking up to the sound of music, but today I awoke with a splitting headache, an expected after effect of the extensive nano reconstruction process I have had to go through after yesterday’s little disaster in The Pearl Turtle district, as I have been told by our Sophotect Akaseni.

I am still surprised by the extreme regenerative capabilities of this Motherforge that the Sophotect is using. No 12 hours before I was lying on the ground in some goddamn control room, my back pierced by several Teseum rounds by some bloody USAriadnan soldier, and now here I was waking up in my bed with nothing but a headache to show for it.

Still I was “ordered” to have a day off to rest by Akaseni, and since it was supposed to be my free day anyways, even though Agents of the Imperial Service never really truly have a day off, more like a few hours without bullets flying over their heads or endless paperwork to do, I decided to finally take the time and turn this new place I live in into a place I’d actually call home.

The delivery of my belongings had finally arrived, most likely hastily packaged and sent by some random servants of the state after I was so suddenly and forcefully transferred to this new position after my virtual audience with his Majesty, without any time to actually take care of stuff like that.

I was glad to find that most of my important belongings had made it to my new home. My Kitchen Utensils where already stacked in boxes in my new kitchen area, my clothing was in front of my cabinet, and even my more eccentric stuff was present. I placed my family shrine together with our old family Samurai Armour on the opposite side of the new synth leather couch I had ordered the other day for my living room, right next to the Holo projector and the soon to hold classical Japanese literature bookshelf that was there. Yes I know, bookshelf, what a waste of space, but sometimes I just prefer reading an actual book made of paper over watching holo philosophers reciting their most famous quotes right in the middle of my living room. Not to mention that it does help giving the room a bit of class that my random assortment of stuff normally wouldn’t.

Placing the Holo Group Picture of my JSA Squadmates and Subordinates we had taken after the campaign on Flamia on its place on the side of my family shrine and activating it, I clapped twice and lowered my head for a split second in thought of my comrades, wishing them good luck as I smirked and continued on with decorating my home.

Seeing the immense amount of boxes I decided it was time to activate my trump card!

Ripping the packaging material off and slowly opening the giant boxes front, I took my first look at what would become an integral part of my home life from now on.

In front of me stood a human looking Automaton inside of its transport box straight from the manufacturer. It was a female model designed to look like a strange mix between a schoolgirl and Geisha, a white slightly robotic looking face with red markings and a typical Geisha Wig on her head, but with the height and appearance that looked no older than 16, and a strange outfit that looked like a cross breed between schoolgirl uniform and geisha clothes, the material closer in looks to the geisha clothing, the skirt and hex pattern covered stockings clearly an homage to an old schoolgirl look though.

Supposedly the design was chosen to give of a non-threatening feeling, while still maintaining the automaton’s ability to fulfill her duties and look pleasing to the eye without crossing the uncanny valley.

This version of the Automaton was a Prototype Test run Design, with the final products intention to be given to high ranking or otherwise important Yu Jing personal as their home assistant. It was not only designed to be a house servant, but its frame was built around the current Karakuri Design, which meant that it actually was equipped for and capable of full on combat operations if need be.

This allowed for the Automaton to not only serve as a basic housekeeping robot, but also a secret protector of its master’s house and family in his absence. The need for such a creation has become obvious in recent times with blackmailing and assassination attempts on important Yu Jing Personal on an all-time high due to the recent Paradiso incidents, and since the development of this Automatons was obviously done by the Army, and more specifically the Japanese Karakuri Development Division of the Army, I had been given one to test run.

Pressing the activation button behind the Automaton’s ear I watched with interest and amusement as the 1,60 meter tall female looking creation started to spasm for a second, most likely to calibrate it’s servos, and then suddenly opened its artificial eye lids and scanned me with its currently black eyes.

With a mechanical click her mouth opened and a monotone female voice echoed without the mouth moving “New Master ID Confirmed, Yasashii Fuyu, please define Name, Hairstyle, Eye and Hair colour and voice/personality setting for this unit.”

Thinking for a second I finally responded “Yuki, Neck length open, Ice Blue, Ice Blue, Formal Friendly, Formal”.

The eyes of the Automaton started glowing for a second as it processed the request, and soon afterwards the eye colour suddenly changed to an icy slightly glowing blue, the hair turned to an icy almost white blue, the Geisha Wig suddenly popped open and allowed for the hair to fall down and retract itself to neck length with some longer hair on the front.

Bowing down gently the Automaton raised her head and once again opened her mouth, this time in sync with her words instead of just open. “Sorry O-san, No can follow your request for voice/personality setting. Apparently I come with a test preset for those parameters. My settings are “Teenager, Yakuza’s Daughter”.”

Now I had kind of expected something like this since this was supposed to be a test run and the different kinds of personality had to be tested as well, but “Yakuza’s Daughter”? What a stupidly specific and unpleasant setting was that supposed to be? No doubt the developer of this thing was some freakish weirdo, or maybe this was some cruel joke by the Tokusetsu Butai Member that had told me about this test run….if so I would make him pay!

Hey! *snip* Helloooo? *snip snap* Yuki to creepy old maaaan. What’s your Order O-san? I haven’t got all day you know….well technically I do I guess but you know what I mean.” Snapping me out of my annoyed internal monologue by snipping with her fingers in front of my face while bending forward to look upwards at my face, Yuki looked at me with a slightly annoyed expression on her face, completely at odds with her appearance.

Yeah yeah sorry, I was just thinking about dismantling you and sending you back to where you came from…..but I guess I’ll give you a chance first. Please start by unpacking all the boxes here and placing the content to their respective places.”

With a slightly pissed look on her face the Automaton bent backwards, pressed her hands into her artificial hips, and snapped at me “And what if I don’t know where to put your shit?”

Already knowing that this would turn out to be a very strange Master/Automaton Relationship I just sighed and pointed to the Japanese style table in front of my couch “Just place it on there then….I’ll figure it out later when I’m back….I gotta get myself some breakfast now…want something as well?”

Turning her head to the side while raising one eyebrow Yuki looked at me as if I was some sort of retard “I don’t eat O-san, unless you want me to, I recharge via wireless current from my loading dock or solar energy over my skin if available, not that I need to do that a lot with my reactor core…”

Shrugging my shoulders I just nodded “Fine, we’ll see, maybe I’ll bring you something to eat…might make you look slightly less creepy if you do….anyways, I’m off, cya later!”.

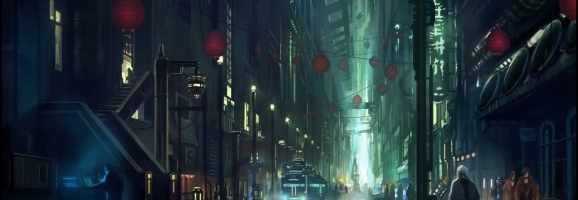
And with that I left my apartment to search the nearby streets for some proper breakfast. As I stretched my arms over my head while leaving my building, ignoring the strange cracking noises I heard back from my apartment, and taking in the slightly cleaner morning air I realized that it already felt a little bit more like home to me, this strange Area known as “The Neon Dragon”……

Chapter 1.6 : Battle Report 3: The Pearl Turtle

IMG_1667ISS Liste.jpgIMG_1658.JPGUSAriadna Liste1.jpgUSAriadna Liste2.jpgWP_20160725_15_54_04_Pro.jpg

Note: For those of you who speak german or just want to see some nice pictures from the USAriadnan side of things, my opponent also made a lovely battle report of this battle which can be found here:

USAriadna Propaganda


Payback for the Caledonians would have to wait though, as the very next day one of our Kanren field agents informed us that a USAriadnan Undercover team had infiltrated the high society area known as “The Pearl Turtle”, a small and usually highly guarded area of The Neon Dragon where the right and powerful have created their own little world, far away from the dirt and noise of the commoner’s living and working areas.

The Area was a festering pool of corruption and favouritism, an area where the rich got richer and the poor weren’t even fit to enter, where secrets were as common as dirt in the rest of The Neon Dragon, and anti-state propaganda spread as easily as STDs in the Red Light districts.

It was very high on my list of areas to purge (yes I kept myself busy the last days), but the purging would have to wait for another day as today it seemed like the corruption had finally reached its peak in the form of Minister Pan Choi’s Secretary apparently attempting to flee the country by offering secret and compromising data to USAriadna in return for a save extraction, most likely to an even more corrupted and decadent area on Dawn, although I really don’t understand what a spoiled brat like that would see in a dirtball such as Dawn.

No matter the reasons for her attempted betrayal, it was our duty to prevent it and recapture the Secretary, as well as prevent the stolen data from being sent to USAriadnan spies.

We didn’t have time to scout the area with a Su Jian this time, so I had to enter the area with the most firepower I could muster in the short time, and go right for the offense.

IMG_1664IMG_1665.JPG
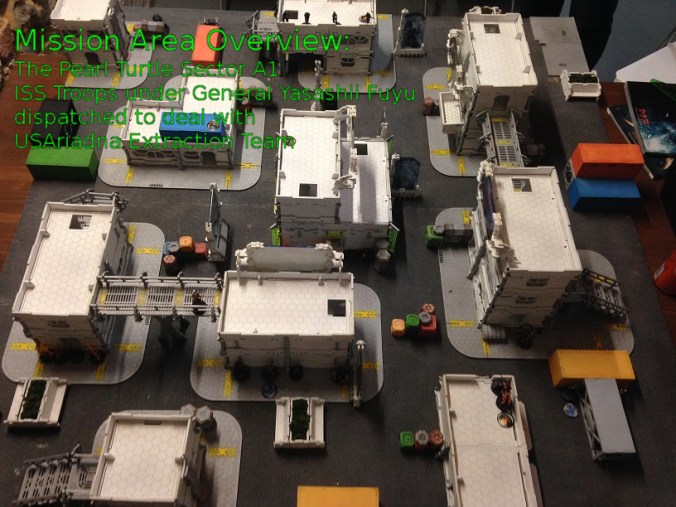
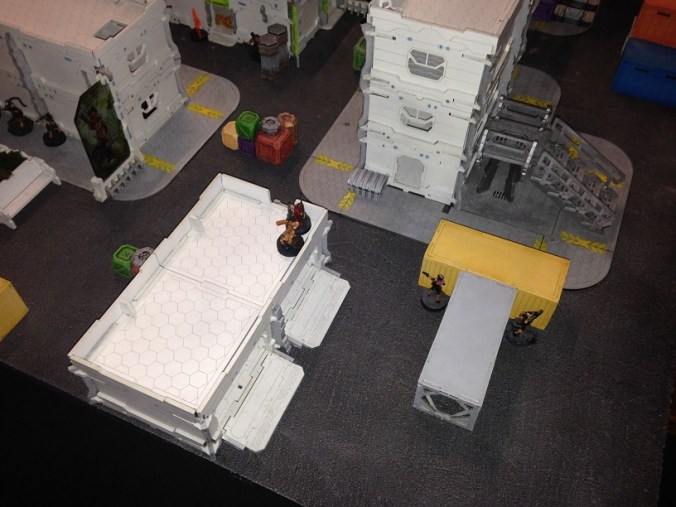
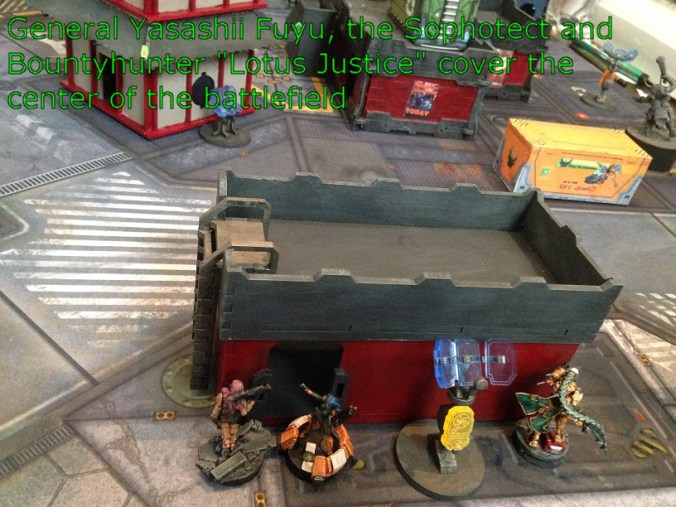
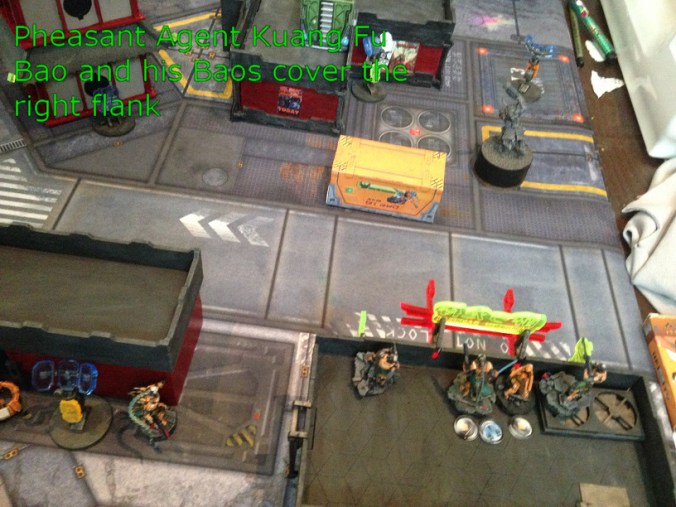
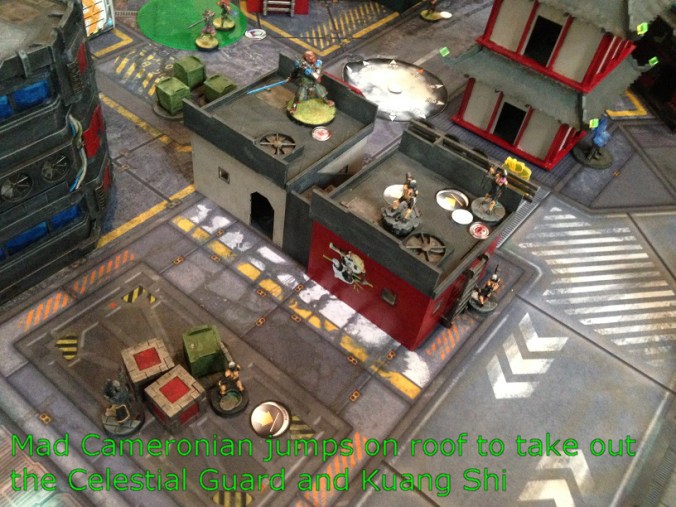
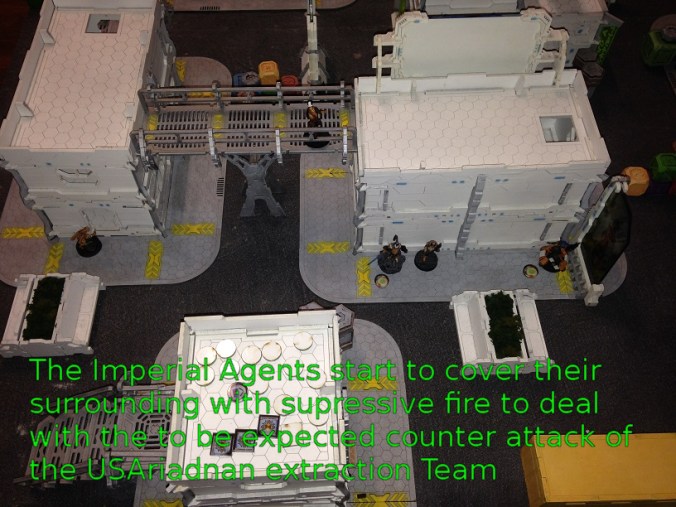
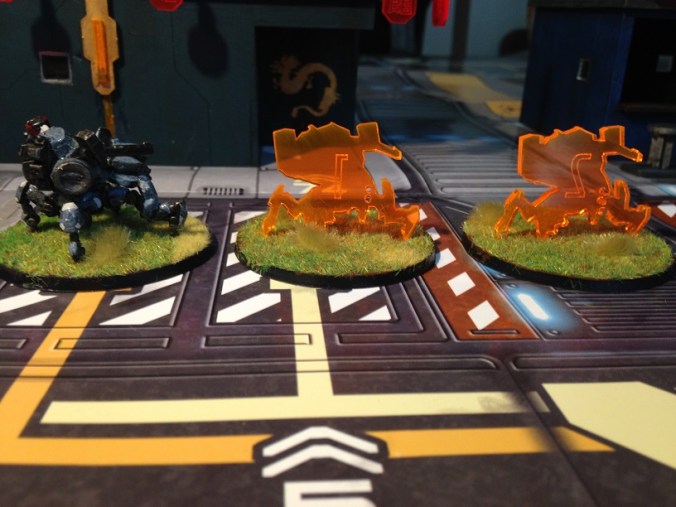
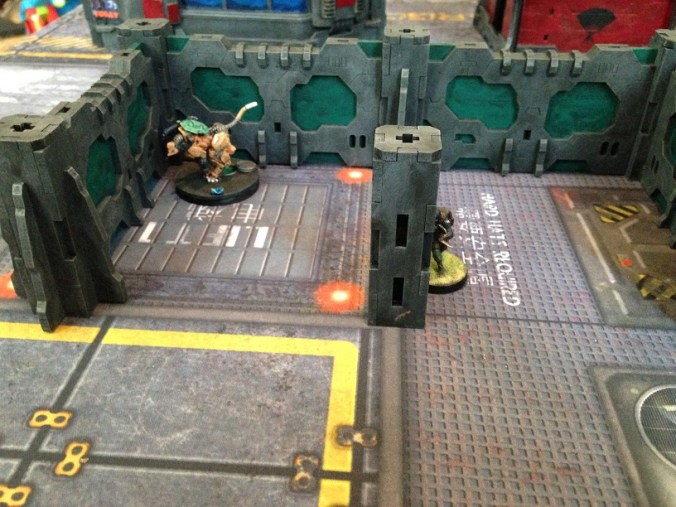
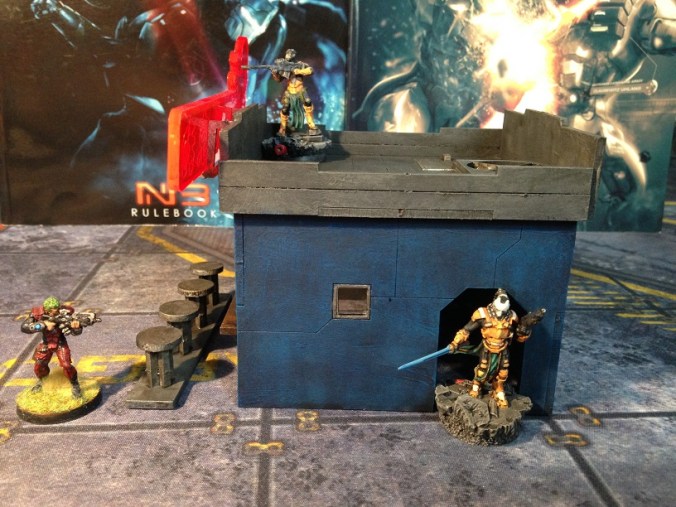
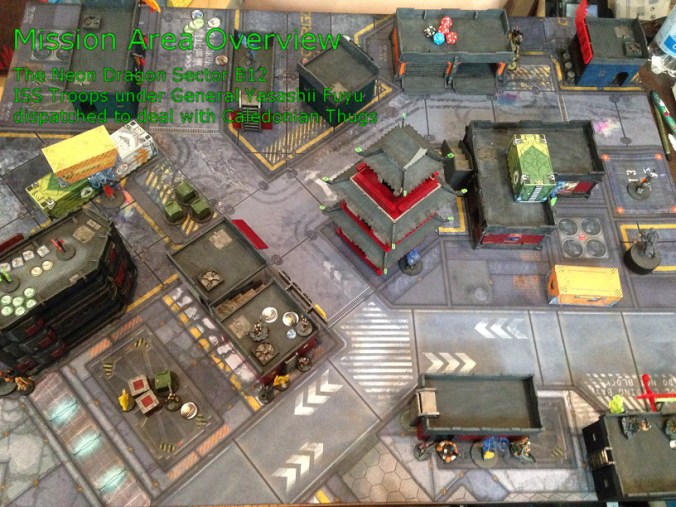
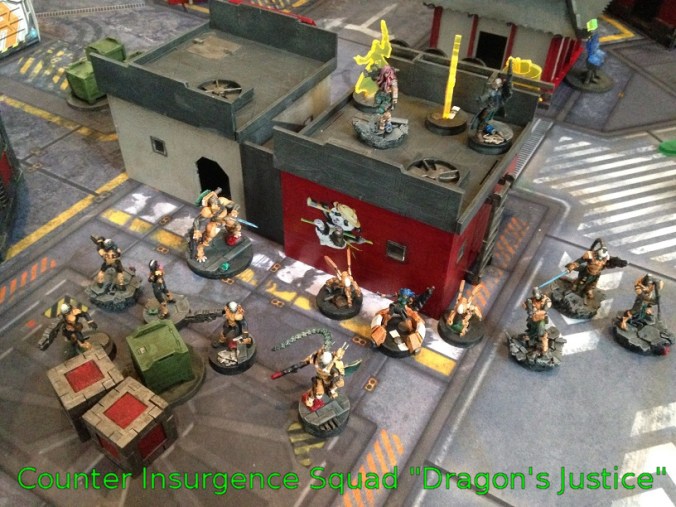
In the middle of the operation area Pheasant Agent Kuang Fu Bao and his Bao Troopers as well as the Sophotect Akaseni were building the solid core of the force, while “Father Anderson” and a Yudbot covered the left flank, and Celestial Guard Shen Jing with one of her Kuang Shi, a Sniper Mercenary named “Bonbori” and I myself were guarding the right flank.

Kanren Agent Umibozu was deployed deep within the area of operation as he did best, and even though the USAriadnan forces clearly where cut from a different cloth than their Caledonian colleagues, we still managed to keep the initiative and surprise them with our attack in the middle of them securing the traitor.

IMG_1670.JPGIMG_1671.JPG
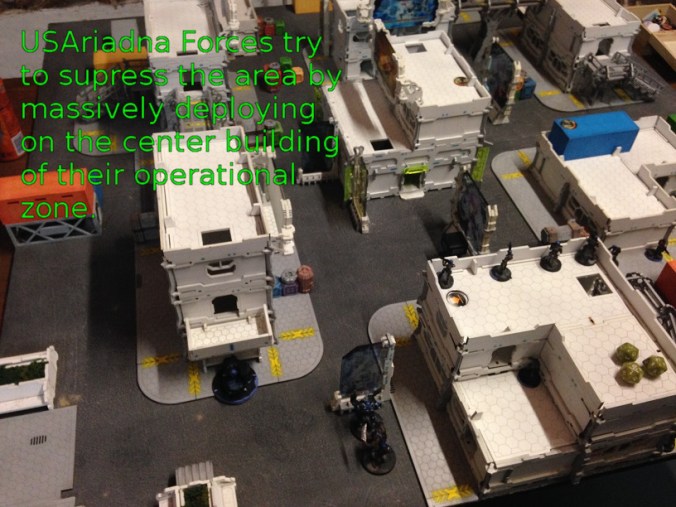
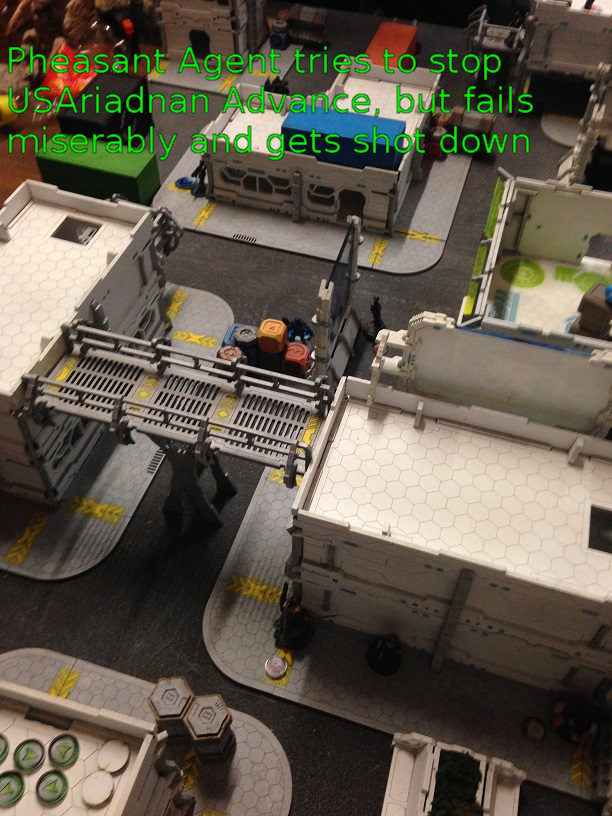
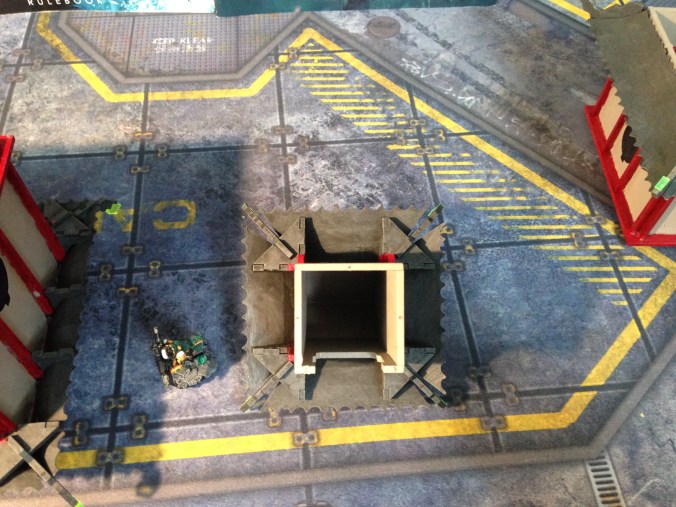
Since the USAriadnan Exfiltration Team had taken control of a building covering most lanes of approach and had hunkered down there with quite a big chunk of their forces, our first step was to clear those lanes of advance, and the first way of doing so was to send the Bao Sniper that was accompanying Pheasant Agent Kuang Fu Bao’s out to take care of the enemy HMG Grunt covering the left flanks approach.

A skilled headshot quickly ended the HMG threat, but to my frustration the Bao wasn’t careful enough and also entered line of fire of another Grunt, who promptly took him out with a wide range rifle salvo.

IMG_1672.JPG

With the long range firepower of the left flank gone, it fell upon me to clear out a bit more of the enemies sniper nest, and so I took to the corner of the right fire lane and quickly took out the lone Grunt that could see me from that angle with my Spitfire. The last standing Grunt on the roof was quickly taken care of by “Bonbori” who ended him with two quick shots from her Sniper rifle, and thus our ways of advance where opened.

IMG_1676.JPGIMG_1680.JPG

Our little cleaning action had however taken a bit too long and USAriadna was obviously preparing for a counter offensive, so “Father Anderson” dashed forward into a better combat position, and my remaining troops took up suppressive firing positions while Kanren Umibozu secured the first Antenna in the area to prevent the Exfiltration team from sending the stolen Data of the Traitor.

IMG_1682IMG_1684.JPGIMG_1686.JPG

The USAriadnan counter offensive began with a howling Dog Warrior and his Antipod Pet dashing towards the Central Control room, most likely out for Father Anderson’s life. It was a mad suicide rush because it brought the creature right in the firing lane of “Bonbori” and myself, but the creature was very lucky and a smoke grenade protected him from any further harm. This was quickly followed up with them sending one of their covert operators into the central control room to take over one of the antennas there. This resulted in a little firefight between the Operator and Kanren Umibozu, but the Operator managed to hide behind the Antenna before Umibozu could execute justice on him.

IMG_1689.JPG

On the left flank the enemy team advanced around a building, but their advance was halted as one of their troopers suddenly realized that an independent journalist of the Yu Jing Freedom Press was actually filming his approach, catching him in the middle of his crime. Unclear on what to do about it the enemy trooper quickly averted his head and dashed for cover while most likely contacting his superior for further orders.

IMG_1690.JPG

The enemy now spent a lot of time advancing his troops into favourable positions for future advances, and an enemy Paratrooper landed in our flanks, only to fail taking down even the lonely Yudbot standing there.

IMG_1692.JPG

Using this blunder on the enemy side I quickly seized the initiative back and advanced towards the central control room. A quick Spitfire burst from my flanking position against the USAriadnan Operative that had been taking control over the Antenna ended his shady dealings, and with the confidence that only being the Law and the protection of a Heavy Suite of Armour could give, I strode right in front of the enemy Dog Warrior and Antipode that were heading towards the Control room, showering them with Spitfire bullets and eventually ending their mad advance with a burst of my double Nanopulsers.

IMG_1693.JPGIMG_1698.JPG

With the central room now clear Kanren Umibozu advanced to take control of the Antenna there back from the USAriadnan Forces, while the Journalist tried to zoom in on some strange movement on top of the Central Room, but he just couldn’t make out where the movement came from.

Knowing that our momentum was spent my troops once again prepared themselves by going into suppressive firing positions and steeled their hearts for the incoming storm.

At first everything seemed to work out alright, the remaining enemy Grunts on the back building tried to advance and one of them was hosed down by my Spitfire while the other one was forced back into cover, but then the hidden Hardcase that the Journalist was about to discover revealed himself and took out “Father Anderson” with a cowardly arrow to the back. Obviously this was instantly followed up by a Headshot from “Bonbori”, but the shoot was a split second too late for “Father Anderson”.

IMG_1701.JPG

The Journalist had managed to make some good footage of this brutal USAriadnan attack on Imperial Service Personal though, and it seemed like USAriadna had now decided that they needed to act before this information leaked.

IMG_1703.JPG

The trooper that had before reeled back from the camera now blatantly dashed forward and killed the defenseless Journalist in a hail of bullets, and with “Father Anderson” out of the picture; he advanced right into firing arc of the Control Room and opened fire into my back.

IMG_1704.JPG

The Teseum infused bullets of the Trooper proofed to be too much even for my Crane Armours formidable protection, and with a sharp pain in my back I fell down as my suites Servos where destroyed by the hailstorm of bullets released from the sneaky Minuteman.

With this the tide of battle had turned, not only did our enemy get the advantage in position and firepower with me and Father Anderson out of the picture, and his troops advancing even further while taking control of the first antenna on their side, it also seemed like the corruption and anti-state propaganda in the area was even worse than I had feared as countless “Pro Freedom” activists (at least that’s what their shields and banners claimed) suddenly appeared on nearby rooftops and windows, and started throwing all sorts of debris and stones on my remaining troopers while shouting “Freedom from Oppression” “All Baos are Bastards” and other profanities like that.

Unable to deliver justice to those traitors against the Jade Emperor with the threat of USAriadna in front of them Pheasant Agent Kuang Fu Bao dashed forward to stop the enemies advance with his Red Fury rifle, but the hailstorm of debris from the protestors as well as the hailstorm of bullets from the USAriadnan Troopers proofed too much for even such a formidable Agent as Fu Bao, and he was downed by the enemies bullets before he could even take out a single enemy.

IMG_1708.JPGIMG_1709.JPG

Sophotect Akaseni dashed over to Fu Bao and with a burst of Nano Regenerators she managed to bring him back to his feet, but he was instantly greeted by yet another shower of bullets and stones and was taken down again instantly.

IMG_1711.JPG

The remaining Bao Trooper tried to cover Fu Bao by advancing as well, but he meet the same fate as his superior, and thus all that was left on this flank was Akaseni trying to stabilize the two with her Motherforge, while resisting the urge to fire her Combi Rifle at the surrounding traitors on the roofs and windows.

IMG_1715.JPG

With command structure now broken and little remaining forces all remaining troops except Sniper Bonbori and Sophotect Akaseni advanced towards the Central Room to protect the antennas. One of my secret agents that had been lying in ambush the whole time also advanced, and while winking at me with a digital-smirk on her facemask she quickly dashed out of the Control room and quickly returned back into it, the traitorous Secretary suddenly in her hands and her Blade at the Secretary’s throat.

IMG_1712.JPG

Still unable to move and in quite a bit of pain, I took a little solace in the fact that at least this part of the mission would be fulfilled no matter what.

With Celstial Guard Shen Jing and one of her Kuang Shi’s as well as Kanren Umibozu covering the Control Room’s Antenna and Reinforcements on their way I actually was quite confident that we might keep the enemy from sending his Data, but just as I thought so I was instantly punished by the sound of smoke grenades exploding and a motorbike driving by the Control Room.

Realizing our mistake I wheezed an angry “To the second antenna! Now!” through my bloody teeth, and as the meaning of my words dawned on Umibozu and Shen Jing they both nodded towards me and each other and dashed towards the first Antenna that Umibozu had taken control off.

IMG_1716.JPG

Hearing dashing footsteps in front of them, followed by frantic curses and “Access Denied! Access Denied” command prompts from the Antenna in front of them Shen Jing and Umibozu ran through the enemy smoke screen, while deflecting random debris that was still being thrown all over the place by the protestors.

Seeing the shimmering light of the Antenna’s console right in front of them they almost flew the last few meters, but just as Kanren Umibozu took the last step and slashed at the Antenna and the area in front of it with his Monofilament sword, the words “Transmission Successful, have a nice day Jenny!” could be seen on the split screen before it slid to the side, it’s entire frame cut cleanly into two pieces by the Monofilament Blades cut.

IMG_1719.JPG

Jenny was nowhere to be seen, most likely whisked away in the Smokescreen’s cover, or worse by the support of the traitorous Protestants on the floor above the Antenna Control Room.

With the voices of protest slowly dying down as the Sirens and loudspeaker noises of the approaching Imperial Service Reinforcement Transporters grew louder, I knew that this battle was lost. We had secured the traitor, but the most important part of the mission was failed, and I was quite sure that the resulting consequences of this wouldn’t be pretty.

At least the Journalist had been killed, so there wouldn’t be a need for too much cover up of this story, at least not for now, but as I was carried into a flying Transport for immediate evacuation to our medical facilities, Akaseni right at my side, I swore that “The Pearl Turtle” would become a more prominent place on my “Areas to be purged” list, and that I would personally attend the adoption of our newest Kuang Shi….it was about time that I’d learn more about that process anyways.


Comment:

What an awesome battle this was! My opponent was a great guy and we had lots of fun all throughout the game. Luck turned back and forth and turned this match into a desperate fight until the very last order, and that’s what every good battle should be like! It was my first time playing against USAriadna and I wasn’t prepared for all their nasty tricks….I think I really need my Hsien next time to deal with all those smoke screens and heavy firepower comming my way. Reveeeenge! ;-P

Customeeple Review Part 6: Yu Jing Holoechoes

Hello Everyone,

As the currently last part of my Customeeple Review I’ll be taking a short look at the Yu Jing Holoechoes I ordered for the current Models I have.

Sforza Holoechoes

Yaoxie Lu Duan Holoechoes

Kanren Holoechoes

The Holoechoes come in small plastic zip bags with a little description paper (which shows you the ocntent of the package), 2 Holoechoes and 2 fitting bases for the Echoes. (In case of the Lu Duan Echoes I got to choose which size of Bases I wanted to have)

Package.jpg

Assembly is obviously easy, as it just consists of glueing the Echoes on the base, but since I used Resin Bases fitting to my other ISS Models for some of them, I can say that they work with most of them as well.

The size of the Holo Echoes fits the model perfectly, the only slight exception being the Lu Duan where the silhuette seems to have been taken from a slight angle, which makes it look a bit odd when standing next to each other, but is no problem in the game.

(Miniatures and Resin Bases not included and only added for scale and cool looks)

Assembled Sforza Holoechoes:

IMG_1629.JPGIMG_1631.JPGIMG_1635.JPG

Assembled Lu Duan Holoechoes:

IMG_1648.JPGIMG_1650.JPGIMG_1651.JPG

Assembled Kanren Holoechoes:

IMG_1637.JPGIMG_1640.JPGIMG_1642.JPG

All together:

IMG_1653.JPG

The Echoes are very playable and look quite good. I am a bit scared of the Sforza Echoes loosing their stretched out finger, but it definitely needed to be there otherwise they’d only look half as cool ;-P

I’ll give these sets a 9/10, I think they do what they where supposed to do almost perfectly, and I think the only way to improve them a little would be by adding a slight outline of the figure on the Echo itself, but that’s just my personal preference.

Micro Art Studio Review Part 2: District 5 Walls Straight & Gates

Hello Everyone,

Since I am currently madly collecting all sorts of awesome terrain to make my Tabletop look better, I couldn’t resist grabbing the following pieces of terrain as I saw them stocked in my local hobby shop:

District 5 Walls Straight

District 5 Walls Gates

I sadly don’t have any nice pictures of the packages or the unassembled or unpainted parts of these sets as I snuck this purchase past my Wife and secretly assembled and sprayed them in the dark of the night, while letting all the evidence of their “newness” vanish into a trashbag that I whisked away the next morning…….

Luckily my wife pretended as if nothing had happened when the next day suddenly a chinese wall  was standing on my desk, waiting to be painted  ;-P

The Kits come wrapped in foil and include a nice and detailed instruction sheet.

Micro Art Studio defnitely make some of the best instruction sheets for their products and I had no problem whatsoever assembling them according to the instruction sheet.

I couldn’t see anything like a downloadable version of these instruction sheets, but maybe I just didn’t find them.

Assembly of the wall segments is easy enough, the only real difficult parts being the sloped corner segments of the gate set, as well as the little bar used to make the door movable (which I was afraid would end up gluing the gate shut or breaking, but none of which happened).

(Once again, miniatures not included and only added for scale)

District 5 Wall Straight Painted:

IMG_1588.JPGIMG_1592IMG_1593.JPGIMG_1596.JPG

District 5 Wall Gates Painted:

IMG_1602.JPGIMG_1604.JPGIMG_1606


District 5 Walls Painted Mixed:

IMG_1608.JPGIMG_1609.JPGIMG_1612.JPG

Painting these walls was surprisingly easy, and the parts are very adaptable and sturdy.

I love little touches like the security cameras at the small wall gates, or the keypad to actually open the doors.

I would however have prefered for both sides of the actual gates to show the “STOP” (although I know that’s harder to produce, and it makes sense to only see it from the direction you are driving from..) as the side without it just looks a bit bland in comparison.

And I would have liked to see slightly bigger free areas on the walls I think. I like the fact that it looks kind of hich techy, but Micro Art Studio has some incredibly awesome Wall Tattoos, and the fact that none of them actually fit those walls is a bit of a bummer.


All together however these kits are quite awesome, and I’ll give them a 8.5/10.

I would recommend them for any Infinity Player that wants a huge Table seperator like  walls, I would however recommend to buy at least both sets together, maybe even an additional set of straight walls, as the gates only come with sloped seperators that just aren’t that useful when building a wall on most tables, and the Straight Pack alone doesn’t have any doors in the wall, making them very hard to pass through.


Micro Art Studio Review Part 1: T00086 Infinity Cargo Crates (5)

Hello Everyone,

Since my gaming table was still lacking a lot of scatter terrain, I finally decided to rid my local hobby shop of it’s long waiting box of Cargo Crates….only to find out that just that day, only 2 hours before me, someone had actually bought it already! Luckily replacement was on it’s way and a week later I finally managed to get my hands on this lovely box.

I am telling you this little story, because aparently Micro Art Studio themselves no longer offer this product on their Website, or maybe it’s just all out at the time of this Review when I checked their site for it.

So instead of linking directly to Micro Art Studio’s homepage like I’d normally do, I’ll link you to my local hobby shop where I got them, because they at least seem to be able to restock them 😉

T00086 Infinity Cargo Crates (5)

IMG_1443

As the name suggests the box comes filled with 5 pieces of resin terrain. Each piece consists of several Crates stacked together in various ways.


Since the crates are of different sizes the end result is cover with various height which leads to interesting firelane situations when moving along a row of crates. One might think himself save behind the crates, only to notice that one of them is slightly lower, allowing for the enemy to see your silhouette as you walk past it.

Since every piece is a solid block or Resin, there is no assembly to be done with this product.

(Miniatures not included, only added for scale)

Cargo Crates Painted:

IMG_1614.JPGIMG_1616.JPGIMG_1618.JPG

The crates were easy to paint and doing so in various colours gave a good result I think.

The Crates fit in perfectly with all sorts of other terrain, and I really look forward to playing with them!


I’ll give this product a 8.5/10.

I would full heartedly recommend this to any Infinity Player that still needs some scatter terrain, it’s sturdy, looks great and is very playable, but I think it could have been improved by adding some more Infinity related Logos or text to the boxes (although that obviously would have reduced it’s utility for other games), and I think the set would have benefited well with at least some small boxes on their own so you could add them to the bigger boxes on different places, creating higher diversity if you’d buy more than one box (which I think I would have done would that have been the case).


Customeeple Review Part 5: 2014 ITS objectives set Infinity

Hello Everyone,

With my order of terrain from Customeeple I also decided to order a set of Objectives, since I have taken a liking to playing ITS missions, but didn’t have all the markers or scatter terrain to make it look good.

I didn’t go for the newest set of Objectives because I also wanted the utility to use it as scatter terrain instead of objective markers should I want to, and the 2014 set seemed more fitting for that to me.

<a href=”http://www.customeeple.com/product/infinity-forbidden-palace/”&gt;http://www.customeeple.com/product/infinity-forbidden-palace</a>

ITS Objectives

I am pretty sure that the Objectives come with a little instruction sheet for assembly, but to be honest, I think I lost it when I initially opened all my packages, and once it was time to actually build the pieces I couldn’t find it anymore…..yeah my table is just a mess of paints, brushes, terrain and miniatures, and somewhere hidden in between a computer ;-P

Unlike most of the other pieces I reviewed to far there is no downloadable version of the instructions on the Customeeple homepage, but if you study the parts long enough it is possible to properly assemble them even without the instruction sheet (although the antennas took me a little bit to fully understand).

Each Objective comes with it’s own base and there is some variety in the plastic parts to distinguish between them.

(Miniature not included and only added for scale)

Assembled and Painted ITS Objectives 2014:

IMG_1620.JPG

IMG_1623.JPG

IMG_1625.JPG

Assembly and painting of the pieces is rather easy (at least if you do it as basic as I did). I had a little bit of trouble with the very small 2 antennas as adding the plastic bits almost broke the “cross” where it’s attached to, and a few of the bigger antenna’s corners don’t look as smooth as I had hoped because the glue instantly stuck on the flat survace and I barely could reposition the pieces once I added them, but that’s just my own inexperience with terrain assembly I think.

I would have hoped for the Objectives to be built so that they could stand on their own even it not glued to the base, because then they could have been better used as normal scatter terrain, but since the bases are needed/helpful when it comes to the actual ITS missions, that is only a minor complaint.


Alltogether I think that this set is quite nice but not every part is as good as it could be. Everything fulfills it’s purpose, but the boxes are extremely simple in look, and the two small antennas are extremely fragile and little more than a cross with 2 plastic pieces on the side.

I think they did a much better job with their later versions of ITS Objectives (http://www.customeeple.com/product/its-objectives-set-2016/) where all pieces look interesting on their own, as well as serving their purpose.

Based on that I’ll give these Objectives a 6,5/10, they look nice, they do what they are supposed to, but there is room to improve and I think Customeeple already did so with their later versions of ITS Objective Markers, although that’s only an assumption since I don’t have them to directly compare with.

Customeeple Review Part 4: Infinity Forbidden Palace

Hello Everyone!

In this Part we will take a look at one of the newest products from Customeeple, and most likely one of their most impressive ones, the Infinity Forbidden Palace!

http://www.customeeple.com/product/infinity-forbidden-palace

ForbiddenPalacePacket.jpg

The Set comes with a short instruction sheet which details the most important parts of the assembly.

So far I haven’t seen any downloadable pdf Version of the Instruction Sheet like there were in the previous parts of the Customeeple Reviews.

IMG_1221.JPGIMG_1222.JPGIMG_1223.JPG

The Instructions are for the most part sufficient, although I did have some parts where I didn’t see the specific details I would have needed to properly assemble it (The main problem being the supoort struts that hold up the roof of the Base Building).

MissingInstruction.jpg

It seems like certain struts where ment for certain sides of the building (one is slightly angled, the other side isn’t) but on first glance I didn’t see that difference on the pieces themselves and the instructions, and I only noticed it once I tried to put on the roof of the building, at which point it was already too late to reassemble as the glue had dried already….so I did what had to be done….and cut it to fit ;-P

That aside the assembly of the buildings was very easy, the hardest part most likely being the roof tiles, which are made of very thin wood (mdf?) sheets which you have to bend into place while they dry, which isn’t too hard, but you have to be careful not to break them or deform them while doing so.

IMG_1217.JPGIMG_1218.JPGIMG_1219.JPGIMG_1220IMG_1239.JPG

Note that I didn’t add a little round part on the very top of the building as I simply liked the building more without it.

Since I most likely was one of the first people to order this lovely set (I just couldn’t resist as I saw it..) my order came with a little flaw. One side of the Entrance Section’s roof wasn’t mirrored, but had the same surface as the right side, which ment once glued in place it had no texture on the upper side, but on the lower side.

I think it’s at this point that I should mention the wonderful Customer Service that Customeeple has. I had contacted them about a problem with shipping fees being charged although I had ordered above the “No shipping fees” threshold, and I had gotten the shipping fees refunded the same day.

And once I wrote them about the wrong roof print (more to warn them and help them improve their product than to receive a replacement since I had already finished painting that part at the time), they instantly sent me the correct replacement part free of charge, and also included another set of Plastic Parts for the roofs.

Now the last part might be important because I originally thought that the colour of the roof lights would always be Orange (which I liked) but it turned out that these parts are made of left over parts from production, and the colour can thus vary depending on what they previously did (which is why I received a bit of a mix, and mostly neon yellow parts instead of orange).

Once I mentioned that I would have prefered the Orange ones they sent them to me free of charge with the corrected roof part, and informed me that if I ever wanted a specific plastic colour, I should simply tell them when I make the order so they could assure I would get the one I like right away.

So keep in mind, if you want a specific colour for the Neon Parts of your order, let them know in advance and they’ll be happy to deliver if possible.

Also the guys from Customeeple where very friendly during our E Mail conversations, and answered within a day or two at most. (Beware however, some of their E Mails can end up in your Spam Folder!)


Now, onwards with the Review!

Once you have assembled this behemoth of a terrain piece, it’s time to paint it up. Once again I painted this thing by hand, and went for a dirty look to fit into the style of my other terrain. Also I went for a more old fashioned colour scheme since I wanted it to look more than an old Japanese Castle than a High Tech Castle, because that’d fit in quite well with my ongoing Story and Characters.

(As always, Models are not included and are only there to show scale)

The Forbidden Fortress Painted:

IMG_1523.JPGIMG_1525.JPGIMG_1527.JPGIMG_1528.JPGIMG_1531.JPGIMG_1534.JPGIMG_1536.JPGIMG_1539.JPGIMG_1541.JPGIMG_1543.JPGIMG_1546.JPGIMG_1547.JPGIMG_1548.JPGIMG_1549.JPGIMG_1553IMG_1558.JPGIMG_1559.JPGIMG_1562.JPGIMG_1565.JPGIMG_1566.JPG

The top part of this can be removed and is actually the roof of the lower floor building.

There are also small doors that can be used to fill the hole in the floor should you want to.

IMG_1567.JPG

IMG_1570.JPGIMG_1571IMG_1573IMG_1577IMG_1579IMG_1583.JPG

The painting of this giant was actually rather easy, although it took a LOT of time to do it by hand, and ate quite a lot of paint as well (as is to be expected).

The lowest level (command room) has some of the best doors for Infinity terrain I have ever seen so far. The bigger ones slide in nicely and unlike many other doors they don’t fall over at all, and the other two doors even come with magnets to attach them, which is just neat!

There are small doors between each building which allow for vertical movement should one desire to do so inside of the building.

The thin roof sheets once painted are actually quite durable, and have so far survived 2 small falls without any damage (thank you son…thank you very much!), however the plastic dragons on the sides are EXTREMELY fragile (and look extremely awesome!) so beware, they do NOT survive a fall at all, and one of them has already lost an arm for me, which I couldn’t find anymore to reglue. (once again, thank you son…thank you VERY MUCH!….)

If you don’t glue the small hut on the top to the building below it is very wobbly and falls off easily, currently I haven’t glued it on yet, but I am seriously thinking about it, as it makes transporting this giant piece of terrain even harder (if you are as lazy as me and don’t want to deassemble it everytime..)

Also Customeeple has learned from their previous buildings with this one I think, every building comes with a nice looking floor, and every roof (except the very top small hut) is detachable.


To sum it up, the Forbidden Palace is just AWESOME! The best piece of Infinity Terrain I have seen so far. It is gigantic and takes up a good chunk of your table, blocks a lot of lines of sight, gives you a lot of levels to play at and looks just gorgeous. It also provides good cover and fits into the Infinity Universe perfectly.

Small problems with the assembly aside everything fits in nicely and the fact that it can be split into several smaller pieces of terrain as well is just icing on the cake.

I didn’t think I’d go there so fast, but this terrain is in fact a 10/10 for me, just perfect.

I would recommend it for every Infinity player if it didn’t have such an obvious Yu Jing Style, which most likely would look odd in an Ariadna Jungle Camp, but if you can find a reason to have a giant Yu Jing Castle standing on your table, GO FOR IT, it doesn’t get any better than this for this price I think.

Customeeple Review Part 3: Neon City Yu Jing B [2 Big Buildings Pack]

Hello Everyone,

In this Part I will take a look at the Neon City Yu Jing B (2 Big Buildings Pack) Set from Customeeple:

http://www.customeeple.com/product/neon-city-yu-jing-b-big-buildings-pack

Big Buildings.jpg

The Set comes with a short instruction sheet which details the most important parts of the assembly.

It can also be downloaded should you lose the original or prefer a digital version:

Click to access Neoncity-Yujing-Big.pdf

Buildings after Assembly:

IMG_1232IMG_1233

The Set  comes with a sliding door for the Samurai Bar (which can be assembled to be movable) and each building can also be assembled with a removable door, ventilators (one big and one small) for the roof, a removable hatch into the building, and ladders for the side of the buildings.

The Assembly was quite easy, although one part of the Dragon Building (the one with the many small lanterns) was a bit odd as you had to deliberatey leave a slit between two walls to later on add a Neon Panel there. I still couldn’t figure out how to make the roof walls fit without leaving small slits on the edges, but again I guess I just didn’t figure out how to do it properly.

There was however a “big” problem with this Kit, the Neon Parts all where too thick for the actual slits they where supposed to slide into, and a bit of cutting was required to make them fit properly.

IMG_1215

Once I had dealt with that however everything fitted together quite well and the end results speak for themselves I think.

(Miniatures are not included, they are just used for scale)

Just like with Part 1 and Part 2 , I painted the building by hand and went for a dirty look to fir with my other buildings and the theme I had in mind.

Samurai Bar Building Painted:

IMG_1485.JPGIMG_1489.JPGIMG_1495

(Wallpaper not included, but the walls take them nicely!)

IMG_1497.JPGIMG_1501.JPG


Dragon Red Lantern Building Painted:

IMG_1503.JPGIMG_1504.JPGIMG_1509.JPGIMG_1513.JPGIMG_1516


Both Buildings together:

IMG_1518.JPGIMG_1522.JPG

Painting this buildings was really easy I have to say, and the Neon Signs add a lot of detail and style to the buildings even if the paintjob isn’t that good (like in my case ;-P)

As with all other buildings of the Neon City Range I once again would have greatly prefered the buildings to have actual floors and detachable roofs, but since the buildings are bigger when compared to the entrances, the floor doesn’t shine through as obviously as with the other smaller buildings I think.

I would have loved for the Red Lantern Building to also have a Lantern on the short side of the building, just to have a consistent outside look, but that’s just a very small gripe.


Alltogether I am once again very happy with this Set, it’s big and covers a good chunk of the table in a good looking maner, it provides good cover and looks very stylish and fits the Infinity Universe very good.

The too big Neon Signs for the slits, the missing lantern on the short side, and the fact that this Set, unlike the smaller 2 Sets from Part 1 and Part 2, doesn’t include any nice supplementary terrain like a stair or maybe small bridge, lowers my score a little bit, which leads me to an Endresult of 8,5/10.

This is a great product that I would easily recommend to any Fan of Yu Jing Style Infinity Terrain, and if I would have to pick between any of the 3 Sets from Part 1 to Part 3, I would most likely pick this one.

Customeeple Review Part 2: Neon City Yu Jing S Octopus + Dojo

Hello Everyone,

In this part we will take a look at the Customeeple Building Set “Neon City Yu Jing S Octopus + Dojo”:

http://www.customeeple.com/product/infinity-modular-buildings-yu-ying

For a closer look at the assembly and instructions that come with the set, please look at Review Part 1 as the two sets are almost the same and share mostly the same merits and problems when it comes to assembling.

The Instruction Sheet for this Set can also be downloaded from the Customeeple Homepage should you lose it or prefer a digital version:

Click to access Neoncity-Yujing-Octopus-Dojo.pdf

In this Set I didn’t see any real differences between the Instruction Sheet and the real product I got, except the 1 missing roof wall I mentioned in Part 1.

IMG_1235.JPG

IMG_1236

IMG_1238.JPG
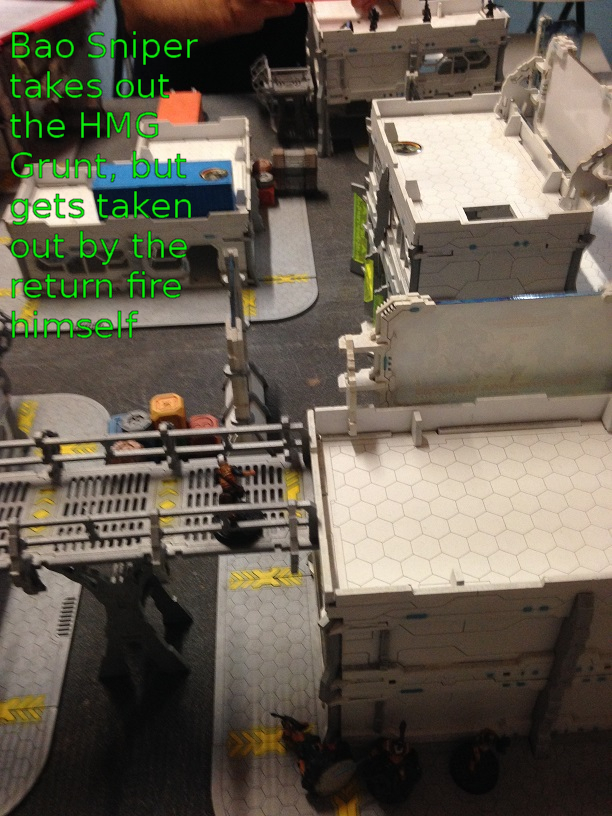
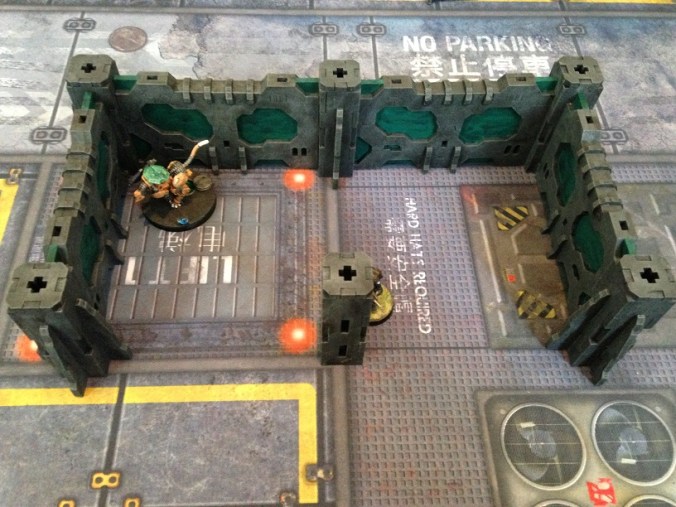
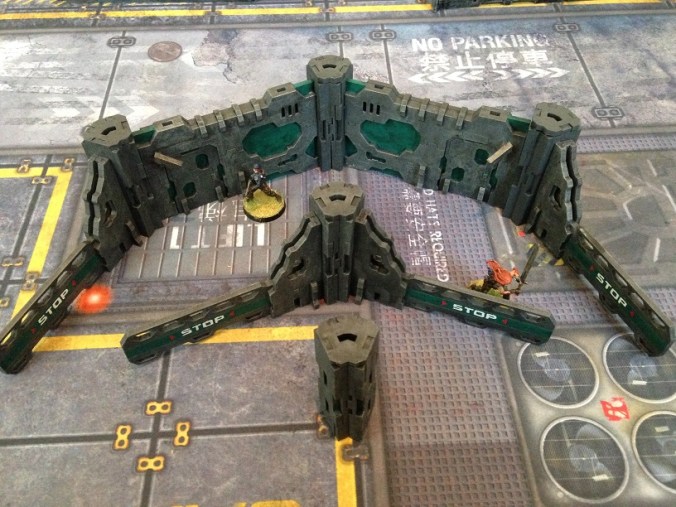
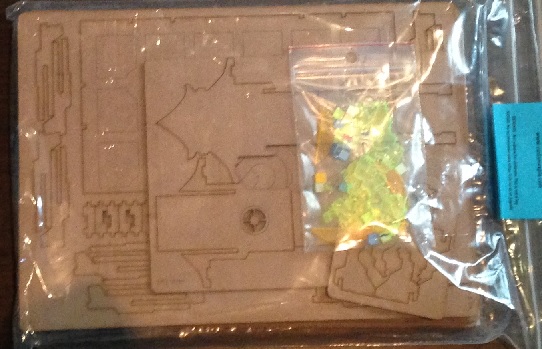
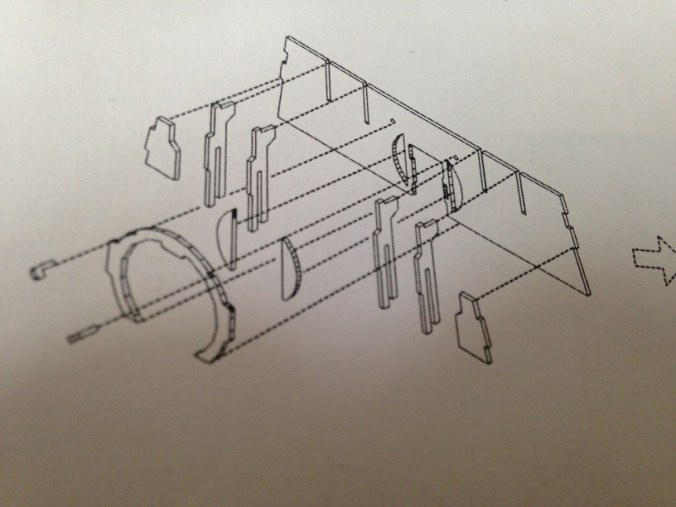
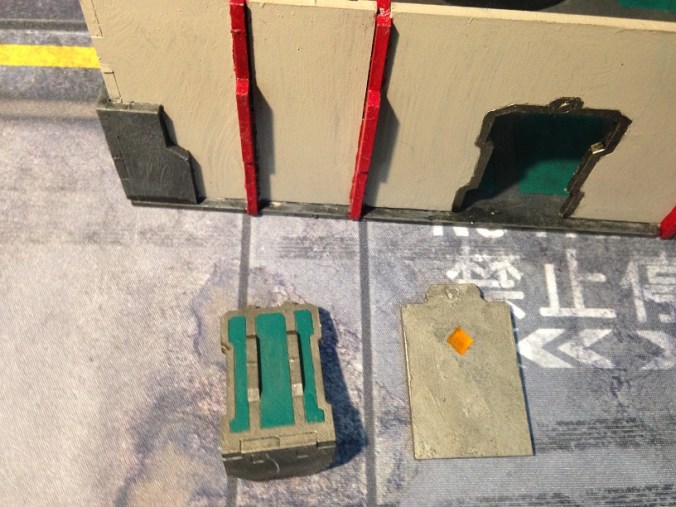
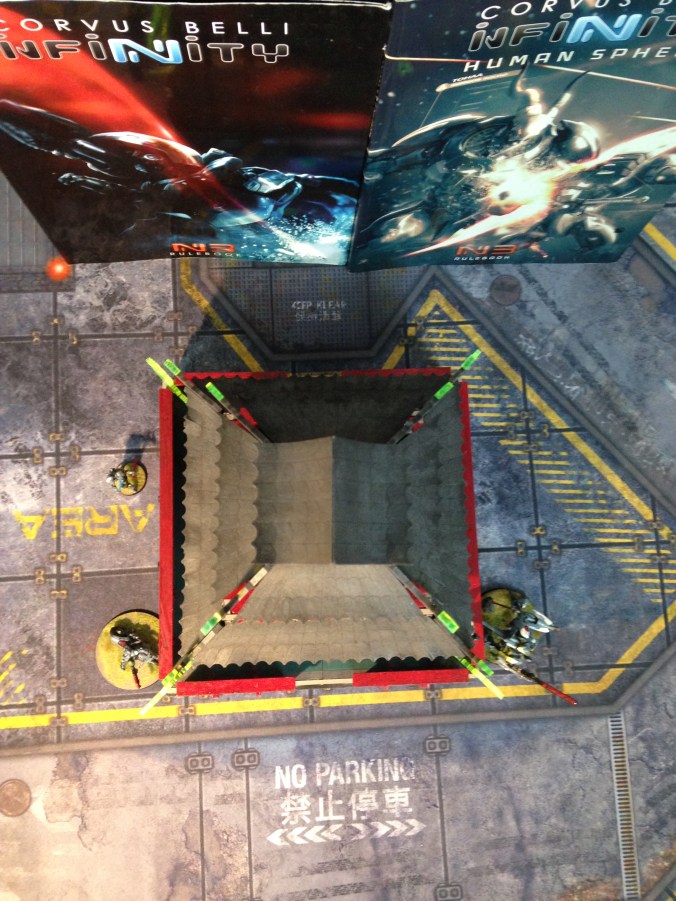
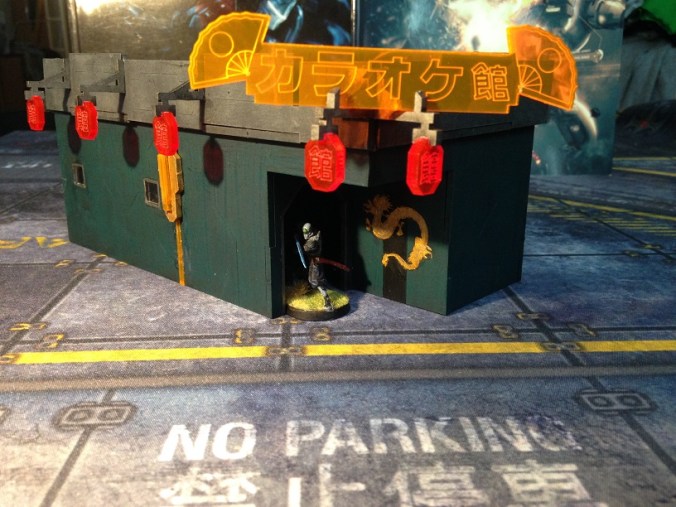
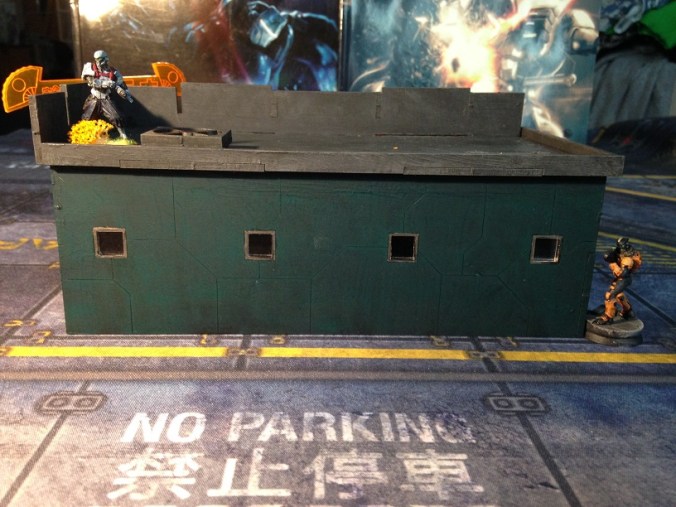
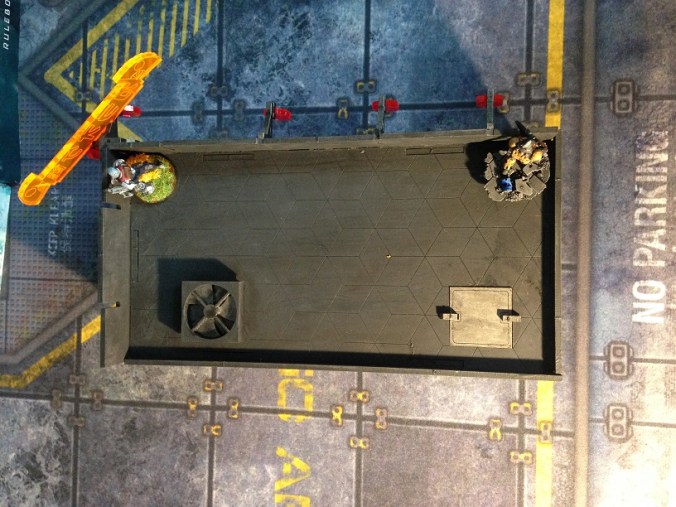
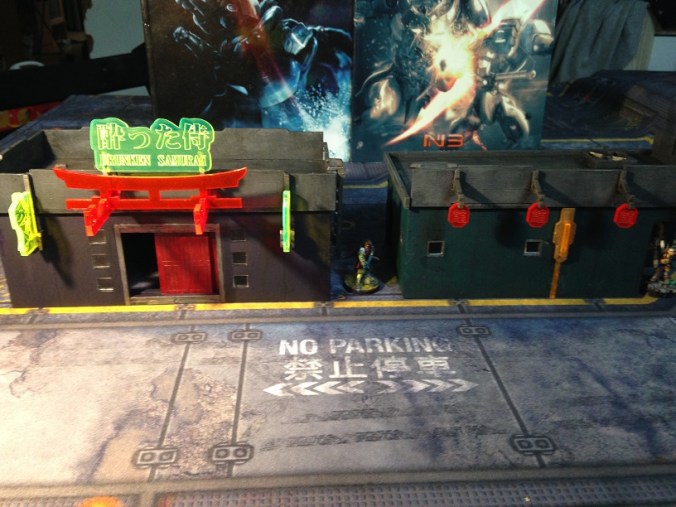
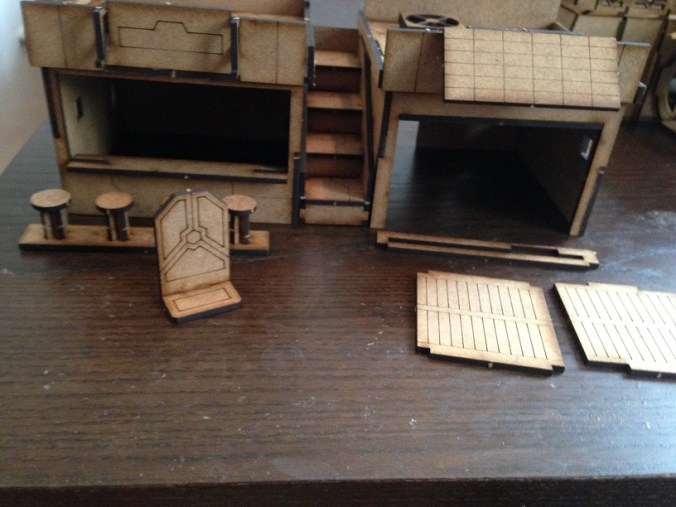
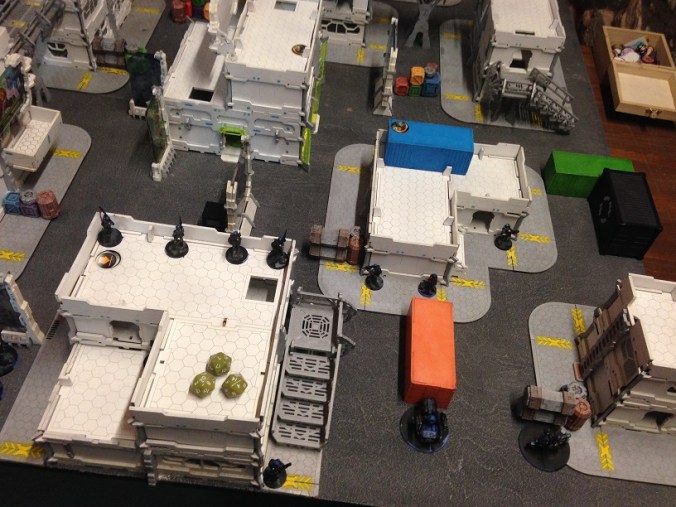
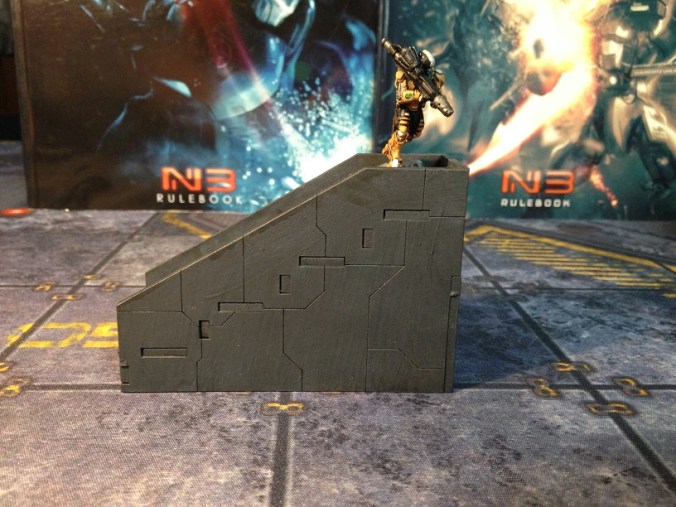
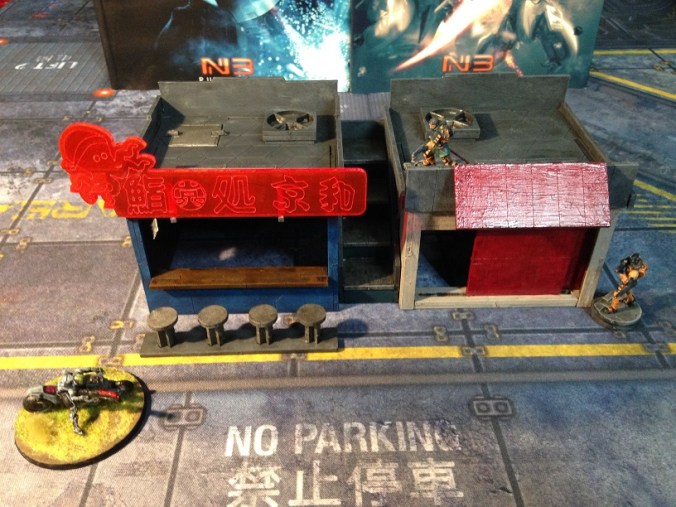
The Set  comes with a row of chairs for the small restaurant, a sliding door for the dojo (which can be assembled to be movable), a stairway to the roof, and each building can also be assembled with a removable door, ventilators for the roof, a removable hatch into the building, and ladders for the side of the buildings.

Just like with the Sushi + Bonsai Set from Part 1, I painted the building by hand and went for a dirty look to fir with my other buildings and the theme I had in mind.

(Miniatures not included and only for scale)

Octopus Building Painted:

IMG_1445.JPGIMG_1451IMG_1454.JPGIMG_1457.JPGIMG_1461.JPG


Dojo Building Painted:

IMG_1464.JPGIMG_1466.JPGIMG_1469.JPGIMG_1473.JPGIMG_1474.JPG

Stairs Painted:

IMG_1478.JPGIMG_1481.JPG

Buildings together:

IMG_1482IMG_1483

Just like with the Sushi + Bonsai Set I would have greatly prefered for the buildings to have a floor and detachable roofs, but that aside I am quite happy with the buildings themselves.

The Dojo looks a bit “old school” for Infinity, and mabe a little bit of a futuristic touch would have helped it along (Maybea Neon Dojo Sign  on the side or something along those lines?), but then again that has it’s own charm and I ended up liking it.


All in all I am also very happy with this Set of buildings. The size is perfect, they fit good into the Infinity Universe, it combines good with other terrain, and is very playable.

With the practice from the first set I had even less problems with assembling the kit (although the small gaps on the roof walls remain..) and like before they are easily outshined by the end result.

I’ll give this set a 7.5/10, slightly lower than the Sushi + Bonsai Set because I think the Dojo could do with a little more Neon, but once again I would recommend this set for anyone who is a fan of Yu Jing style buildings!


Chapter 1.5 : Battle Report 2: New Neighbours

IMG_1280IMG_1261

Cal1IMG_1267ISS1

As I had my little talk with our Sophotect Akaseni in the Surveillance Facility one of our security cameras had picked up some shady Caledonian activities in The Neon Dragon Sector B12. Apparently out actions from the night before had driven those lunatics into even more of a frenzy, and now a big group of them was running around in B12 to terrorize and most likely strong-arm some of our local bar and restaurant owners into some sort of illegal contract.

IMG_1268IMG_1269IMG_1270
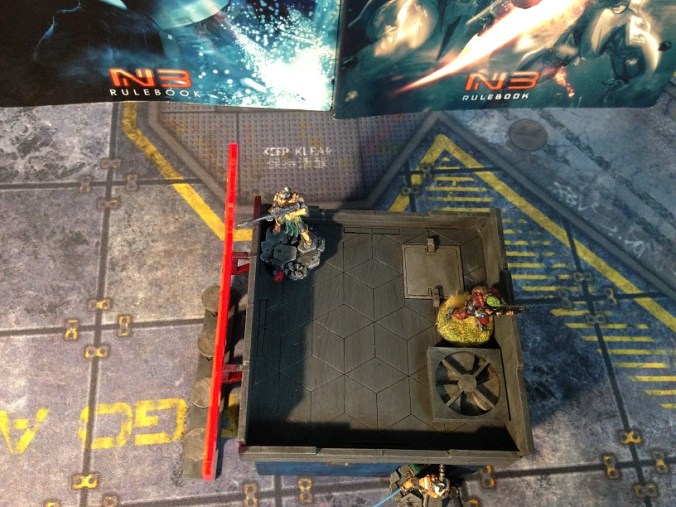
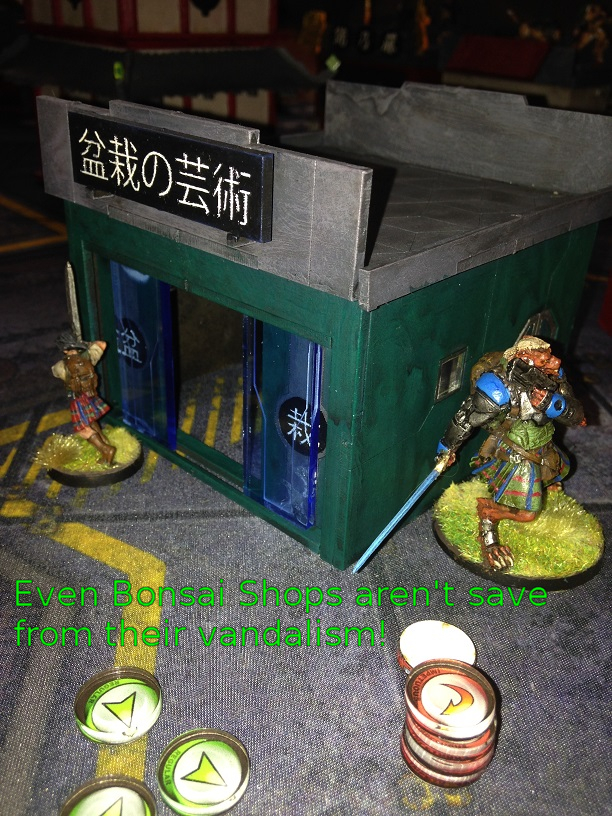
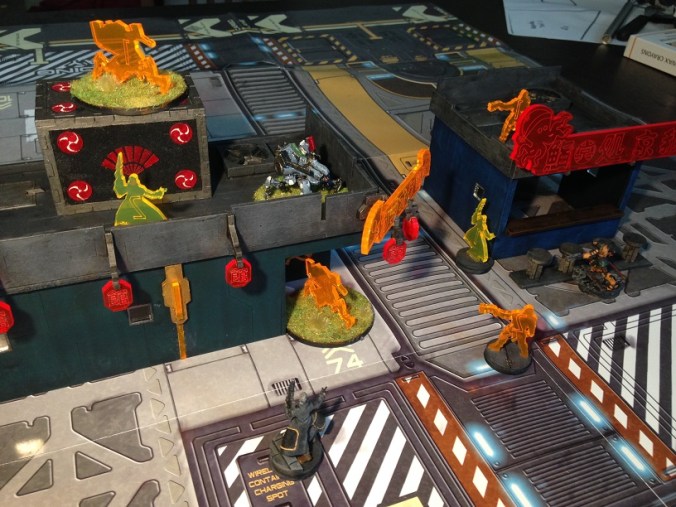
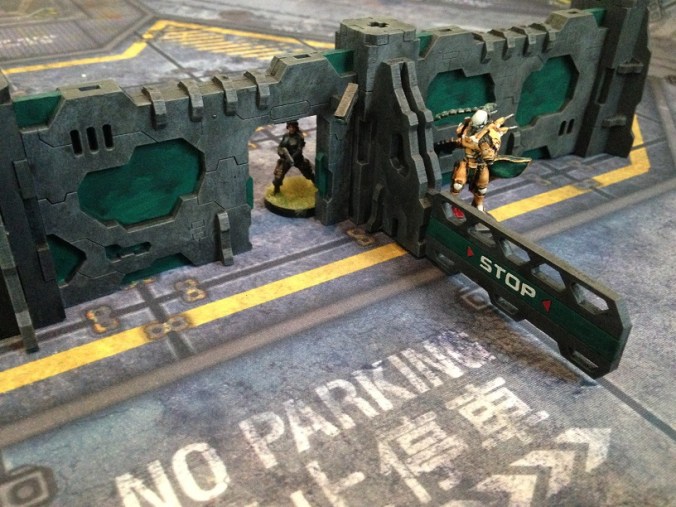
It was clearly time to teach them a lesson and inform them of my new arrival, and it was also a good opportunity to get to know some more of my subordinates, and to ensure that my little box had truly worked.

As I was standing on the elevator platform, one after the other my soldiers arrived as well, although I also saw the priest look alike person I had seen in the above ground part of Neon-jo yesterday, and a woman who wore clothing that clearly didn’t match any uniform regulations of the ISS, although her colour scheme seemed to match ours pretty well.

As Kuang Fu Bao entered the room accompanied by the two Bao Troopers I had previously met in the Armoury, one of which turned out to be the one that I had flattened on the ground the previous day, I gently nodded towards the two oddballs and Fu Bao quickly understood and slightly bent towards my ear while whispering “That’s “Father Anderson” and “Lotus Justice”, two bounty hunters that we regularly employ because of their combat potential and the option to deny our involvement should things go haywire…”

Both Bounty Hunters had apparently heard Fu Bao’s whispers to me as “Father Anderson” nodded slightly towards me as I mustered him, and “Lotus Justice” pulled down her Visor glasses and gave me a cheeky wink before putting her visor back on and checking on her armour, which seemed surprisingly unfitting on her frame, which indicated it to be some sort of loot.

I’m sorry we couldn’t get more new faces in for you Sir, it’s still quite early in the morning as you know. I think you already know my two Baos here, and over there is Shen Jing again with a new set of Kuang Shi ready for battle. The Sophotect will also join us today, told me you’ve asked for her yourself, so I guess you already knew that, and there is also a Su-Jian, but he’s already in the area of operation scouting ahead.” continued Fu Bao as the platform started to rise.

IMG_1272
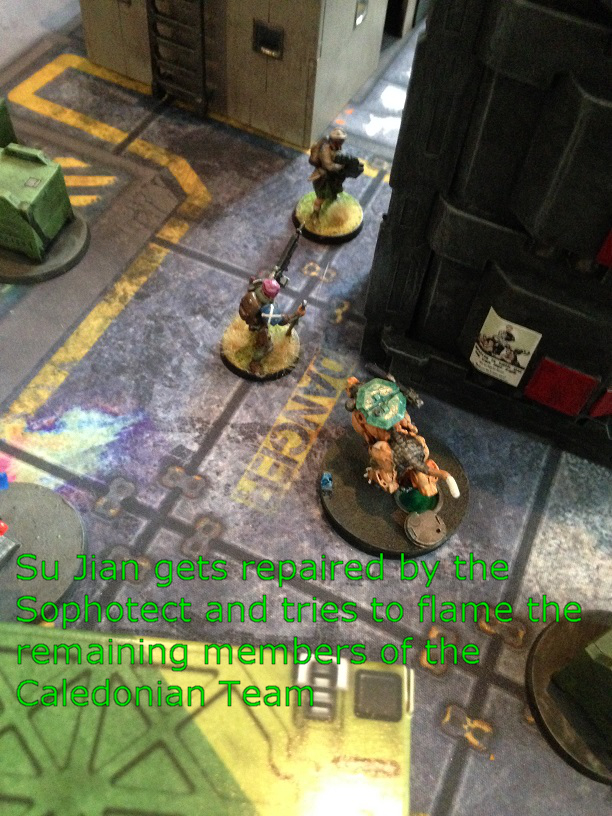
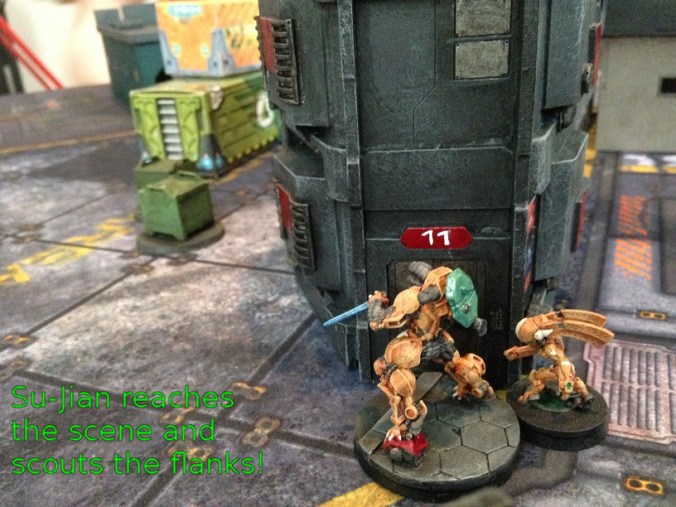
As we reached the surface I instantly received tactical data from the Su-Jian, Codename “Saberrider”, what a joker. I quickly sent out my troops according to the intel, making sure I myself stayed close to Akaseni to survey her behavior during the battle.

IMG_1273IMG_1274IMG_1275IMG_1276

It seemed however that “Saberrider” hadn’t quite managed to stay undetected as the Caledonian Thugs quickly started to attack our positions. The more impetuous of them dashed right out of cover and attempted to cover their advance with smoke grenades, allowing “Father Anderson” and “Lotus Justice” a few good shots which took out one of the Highlanders and wounded one of the Cameronians.

IMG_1282IMG_1284.JPG

As even more Caledonians used the smoke to advance, “Father Anderson” and “Lotus Justice” had to fend off the Caledonian Commander’s Bodyguard, a pair of Wulvers, but it seemed like “Father Anderson” wasn’t using just regular ammunition as one of the Wulvers suddenly broke down while spitting blood and foam from his mouth while howling in pain, and scared by the, most likely viral, ammunition of the bounty hunter, the enemy commander and his remaining Wulver bodyguard retreated back behind the smoke screen.IMG_1285.JPGIMG_1286.JPG

Just as we thought the mad onslaught had come to an end a hidden Cateran revealed himself and took out the Bao Trooper that I had floored the day before. Luckily the Cateran didn’t have any other good targets of opportunity, and even though the Bao most likely wouldn’t be participating in this fight anymore, Akaseni quickly proclaimed that he would live thanks to the Palbot she had standing right next to him which was threating the worst of his wound as we spoke.

IMG_1289

To make things even worse one of the hulking Cameronians used this diversion to jump through the smoke and on top of the building where Celestial Guard Shen Jing and one of her Kuang Shi lay in cover, showering them with his double Chain rifles.

IMG_1293

Totally exposed on the roof of the building the Cameronian took countless shots from the Kuang Shi and Father Anderson as he sprayed like a madman, but as he eventually went down I had lost contact to Shen Jing and the Kuang Shi, indicating that his suicide run was a success.

IMG_1294.JPG

Driven by their comrade’s suicide attack a bunch of Caledonians used the Smoke Cover to advance towards the middle of the table, and one of them, the Hacker presumably, managed to snipe a Kuang Shi through a crack in the Smoke coverage, and even though she was driven back at first, eventually managed to shoot down “Lotus Justice”.

IMG_1296IMG_1297.JPG

Knowing that control of this battle was slowly gliding out of my hand, I quickly ordered for the Cateran to be taken out, but the Bao Sniper that quickly proceeded to the spot where his colleague had fallen before, failed to hit the Cateran, and was wounded in return.

I was just about to lose my temper and jump on top of the building I had been taken cover behind to finish things myself, as Akaseni held me back by pulling on my shoulder and said “Don’t worry General, I’ll fix this…”.

Releasing some sort of Nano particle Cloud from her Motherforge she then not only continued on to heal “Lotus Justice”, but also used her Palbot to quickly seal the wounds of the Bao Sniper and get him back into action with an adrenalin shot.

The freshly “revived” Bao Sniper quickly proceeded to correct his failure and took out the Cateran with a wild salvo of sniper shots.

IMG_1300

With the threat of an enemy sniper gone I proceeded to cover the center of the table from the rooftop of the building I had been standing behind, and both “Lotus Justice” and “Father Anderson” started to pepper the areas in front of them with covering fire to prepare for the incoming Caledonian attack.

In an attempt to ease the incoming blow the Su-Jian Pilot attempted to take out the Caledonian Fireteam that was advancing through the middle, but even though he had a good attack vector, he couldn’t get a proper shot in and was heavily damaged in return, and forced to crawl back to Akaseni’s second Palbot in hope of future repairs.

IMG_1303

So far so bad I thought as I steeled myself for the inevitable attack that would follow from this failed flanking attempt, and true enough the Caledonian Fireteam rushed on under a new Smoke Screen, and even though the Bao Sniper had a small firing lane at them, he constantly failed to hit them, allowing for them to break through the smoke and attack “Father Anderson” and the last remaining Kuang Shi.IMG_1304.JPG

Luckily “Father Anderson” wasn’t ready to kick the bucket just yet, and in combination with the Kuang Shi’s Chain rifle and his own covering fire, he hosed down all but 2 of the Caledonian Thugs with his Viral Rifle.

IMG_1308.JPG

With their flank assault having failed just as badly as my own had failed before, the Caledonian Commander seemed set on at least taking me out, sending his second Bodyguard on a nearby stair to take shots at me with her T2 Rifle. Luckily I spotted her in time, and thanks to the superior X Visor guiding system of my Armour, managed to riddle her with bullets the moment she so much as dared to raise her head above the cover the stairs had provided her with on her way in.

IMG_1310.JPG

A happy “Yeah finally did it!” to my left indicated that Akaseni had succeeded with repairing the Su-Jian “Saberrider”, and soon enough it made its presence known by bursting around the corner of its original hiding place and burning the 2 last remaining members of the Caledonian Fireteam with its Flamethrower.

IMG_1316.JPGIMG_1317.JPG

Seeing as he had slowly run out of troops to assault with, the enemy commander recognized his defeat, and retreated to fight another day at this point, a surprisingly insightful decision for a Caledonian I must say.

With too many wounded or damaged on my side, I decided to let them run away, preferring my troops to return to the bases medical facility rather than bleeding out while chasing lunatics through the streets for little gain.

With my troops gathering near the elevator shaft that’d bring them back to our base, I took it upon myself to confirm the death of Shen Jing by climbing on top of the blood splattered rooftop where the Cameronian had done his suicide charge, only to find that the female Celestial Guard, covered from head to toe in blood and Chainrifle Ammunition, was somehow still alive, giving a blood splattered grin at me through the cracks In her ruined helmet. “Sorry Sir….I think I’ll require another lift….promise I’ll return the favour in time….”.

As I picked up the Celestial Guard, who had fallen unconscious from the strain of me picking her up in mid-sentence, I suppressed a smirk and wondered about her ability to pick me up in my Heavy Suite of Armour, and hoped the day would never come where she’d have to attempt to keep her promise.

Stepping on the elevator platform and returning to base while Akaseni covered Shen Jing with the Nano Cloud from her Motherforge, I decided it was time for some payback for those Caledonians….


Comment:

Wow….I don’t know what my wife had for breakfast that day, but she seriously stepped up her game during this fight. Clever use of smoke, link teams and even her Impetuous troops made me almost outright lose this battle in her first turn. If my Sophotect hadn’t managed to heal my troops so effectively, I doubt I could have pulled that one around.

We both really enjoyed playing on the new table, and hopefully it will look even better with the new scatter terrain I am currently painting and the Operation Red Veil Buildings that will hopefully soon arrive ;-P